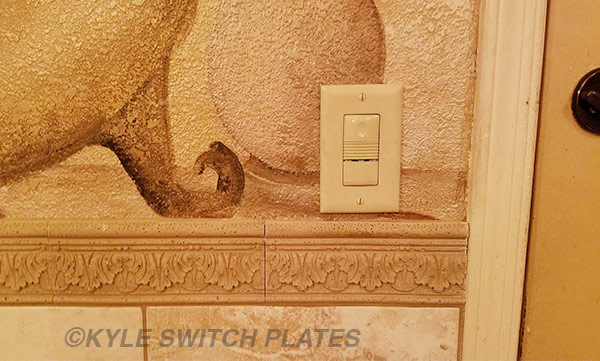
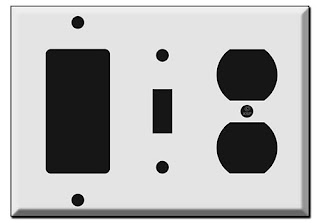
Many of our customers call us regarding tight spaces in which a standard light switch cover just won't fit.
Today, we're sharing how several of them have used small switch plates from our online wall plate store to fix an eye sore or complete a home renovation.
One of the most common problems is tile that runs too close to the electrical box, as two customers describe here:
But switches can also end up too close to door frames, wall trim or other mouldings including high baseboards or board and batten walls that run up too close to electrical boxes.
We've helped several customers fix an unattractive uncovered switch or one covered by a poorly cut cover, and the results have been these 5-Star reviews:
Otherwise, the trim may need to be modified after board and batten has already gone up. which as you can see here, doesn't look very good:
Here, a narrow plate was the perfect fit:
Skinny plates can also work on narrow door frames.
We've even had a customer with a switch between cabinet doors that left too little space after a bathroom remodel:
Other DIY home renovations that raise the surface of your wall and come too close to an electrical box can create an eye sore.
As you can see, narrow switch plates have a lot of great applications and get be a great solution to get you out of a pinch with an obstructions of any kind is blocking your standard cover from going back up.
At Kyle Switch plates we carry over 50 sizes of narrow plates and plates with shifted openings to help you find a good solution. Shop narrow plates or short plates to find a plate that meets your specific needs.
Showing posts with label DIY solutions. Show all posts
Wednesday, January 22, 2020
Tuesday, May 7, 2019
Options for Adding Wall Tile or Trim Around Light Switches
There are so many ways to dress up your walls with decorative moulding.
It can be tricky to add wall tile or wainscot and plan around every light switch or wall outlet.
Here, we're sharing various approaches to incorporating electrical devices into trim or tile.
Ideally, when adding a piece of trim, you'll want to position it at a height that runs underneath the light switch cover.
In this home, moulding was added at the same height as the switches, and this is how the builder handled it:
Next, you can see the homeowner tried to plan out the spacing of the board and batten beams to steer clear of the light switch and outlet.
The moulding ended up so close that a shorter switch plate had to be used over the dimmer switch.
If you don't space batten beams properly, you can end up with an eye sore like this:
Here, another homeowner had to cut into the beams to fit the device covers.
Another solution when this happens is to add extra wood around the device, rather than cutting into the beams to make room.
Here, an entire wall of wainscot misses every wall plate:
As with trim, wall tile that ends underneath electrical devices is always ideal.
If wall tile can't be ended above or below a switch, a common solution is to add extra tile up and around the cover plate, as these next 3 pictures show.
Another solution is to raise the tile and keep it raised until it meets the door jamb:
In this bathroom, the trim tiles were cut to make room for the light switch cover:
It can be tricky to add wall tile or wainscot and plan around every light switch or wall outlet.
Here, we're sharing various approaches to incorporating electrical devices into trim or tile.
Ideally, when adding a piece of trim, you'll want to position it at a height that runs underneath the light switch cover.
In this home, moulding was added at the same height as the switches, and this is how the builder handled it:
Next, you can see the homeowner tried to plan out the spacing of the board and batten beams to steer clear of the light switch and outlet.
The moulding ended up so close that a shorter switch plate had to be used over the dimmer switch.
If you don't space batten beams properly, you can end up with an eye sore like this:
Here, another homeowner had to cut into the beams to fit the device covers.
Another solution when this happens is to add extra wood around the device, rather than cutting into the beams to make room.
Here, an entire wall of wainscot misses every wall plate:
As with trim, wall tile that ends underneath electrical devices is always ideal.
If wall tile can't be ended above or below a switch, a common solution is to add extra tile up and around the cover plate, as these next 3 pictures show.
Another solution is to raise the tile and keep it raised until it meets the door jamb:
In this bathroom, the trim tiles were cut to make room for the light switch cover:
If you've added moulding or tile to a wall and are having a hard time getting the cover plates to fit, find wall plate solutions at Kyle Switch Plates.
Tuesday, December 4, 2018
How to Easily Create a Custom Switch Plate
If you have any switches or outlets in your home that don't have a cover plate - because you can't find one that fits - you're in the right place.
This post goes over how to create any configuration wall plate, without breaking the bank.
You may need a particular configuration that you can't find. Or, you may be able to find it, but not in the finish you desire.
The first question to ask is this:
Can you re-arrange the devices?
Your electrical devices are currently mounted into the box in a particular order.
But they don't have to stay in that order.
If you can find a cover that has the correct openings in a different sequence, unscrew one or two of your devices & swap them around.
This is the fastest and simplest way to get a plate in the correct configuration.
To be safe, always turn off power to the devices before tampering with them.
Shop combination covers here to find the plate you need or one that will work if you re-arrange your devices.
For example, if you have a duplex outlet among dimmers or switches and can't find the cover you need, update the duplex outlet to a block outlet.
Change duplex outlets to block outlets.
Older toggle switches can be updated to modern Decora rocker paddle switches, which are now a more common wall plate opening.
Change toggle switches to modern rockers.
Updating a device's style is another simple solution that will only take a few minutes.
Note: always cut the power to the switch or outlet at the circuit breaker before messing with it to avoid electric shock. Always hire an electrician if you don't feel comfortable handling electrical components yourself.
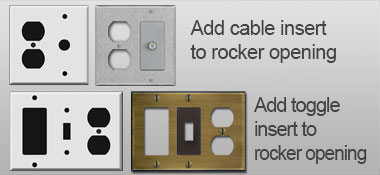
Finally, you can create a custom configuration with switch plate inserts.
Since the larger, rocker openings are so common and available in many finishes, converting them with inserts is a great way to get the custom plate you need.
Inserts typically fill rocker openings and have a cutout for a smaller device.
At Kyle Switch Plates, our most popular selling inserts are for toggle switches.
Toggle inserts sit under any wall plate's rocker opening to allow for a toggle light switch to go there instead.
For example, suppose you need this combo plate, but in a finish that's not manufactured, such as black:
Simply find a plate that has a rocker opening instead of toggle in the center, and add an insert in that spot:
Plate with rocker instead of toggle in center.
Toggle insert for rocker opening.
Inserts are easy to use and offer a great solution to creating your own custom wall plate.
Kyle Switch Plates carries a variety of switch plate inserts in white, brass, ivory, gray, silver, brown, bronze, black and more.
Use them to convert cover plate openings to blanks, toggles, cable/phone jacks and more.
Click to shop combination switch plates and inserts for converting switch plates.
Tuesday, November 13, 2018
Cover an Outlet when Bottom is Tiled & Top is Drywall
If you've added wall tile that ends mid-way up the wall (but not high enough to clear the top of your light switch or outlet), you'll run into a problem when you go to re-attach the cover.
You'll find 2 problems when trying to add the cover plate:
Wall tile stops halfway up the electrical box.
You'll find 2 problems when trying to add the cover plate:
- The outlet will be sunken down into the cover.
- There will be a gap between the drywall and the top half of the cover.
Which, if you're reading this, you probably already know!
Continue reading to...
Learn how to cover an outlet when the bottom is tiled and the top is drywall.
*****Important Safety Note: Always turn off power to your electrical devices at the circuit breaker prior to making adjustments.*****
Solution 1: Use Spacers & An Outlet Cover Extender Ring
This 2-part solution involves lifting the outlet with spacers and filling the gap behind the cover with an extender ring.
First, use spacers underneath your outlet, stacking however many are needed to lift it up to be flush with the tile surface.
Spacers fix sunken electrical outlets when adding tile, board & batten, paneling or another surface to your walls.
Then, place a half size gap extender ring on the tile ledge (going around the top of the electrical box) and tighten the cover over it.
Half-size ring wraps around top of standard electrical box.
These gap filler rings are 1/8" thick. You may stack them to match the depth of your wall tile.
The above solution is great when your tile ends half-way up your outlet box. But if your tile ends in a different spot, the next solution may work better.
Solution 2: Use Support Ring with Gaskets
Add a single-gang support ring underneath your switch or outlet. Like the green spacers in the above solution, this brings the device up to match the surface of the tile.
Your device will mount through the support ring into the electrical box - extra long screws may be required.
Cut foam gaskets to fit above the tile, and stack them to the depth necessary to fill the gap between the ring and the wall.
You can use caulk to seal around the edges along the top portion (over the gaskets). Then, carefully attach the cover plate.
Ideally, you'll want to plan ahead to be sure tile doesn't end mid-way up an electrical box. End your tile below or above it, or move the box up before tiling. (Be sure the allow extra space for the cover plate, which extends beyond the box in order to cover it fully.)
There are no perfect solutions for electrical devices that sit on top of both tile and drywall. But, these 2 options are better than leaving them uncovered altogether or exposed due to a large gap behind the cover.
Tuesday, September 26, 2017
Multi-Light Switch Plate & Outlet Cover Solutions
What to do when you can't find the configuration you need.
As a homeowner, you've no doubt removed a switch plate or outlet cover at some point - whether you were painting your walls or adding paneling, wainscot or tile.
And it's so simple, you've probably given it very little thought (except maybe keeping track of the screws while the plate was off the wall).
If you've lost a cover (you'd be surprised how many get thrown out when a professional painter is hired) or broken one (perhaps screwing the screws in too tight), you've likely run over to your local hardware store to find a replacement.
If that errand failed, you probably a rare configuration - meaning 2, 3 or 4 electrical devices that share a plate are lined up in an order that you can't find a cover for. (At least, you think you can't find a cover.)
The good news is...
There are several ways to solve this problem, which we'll detail below.
How to Get a Switch Plate with Device Cutouts in the Right Order
Solution 1: Re-arrange Your Devices
Often times, we get calls from customers who "almost" find what they need. For instance, a plate with the correct 3 cutouts, but they're not in the right order to match their switches or outlets.
Guest what - this is super, super common.
What many people don't realize is how easy it is to change the order of the devices in your electrical box.
If you have a duplex outlet in between a rotary dimmer and a rocker light switch, as shown here:
You may be looking for this triple cover plate configuration:
And we do carry this plate in 5 finishes (shown in ivory above). But if you're looking to match a room with specialty finish covers - for instance, dark bronze or satin brass - you're out of luck.
Unless, you simply re-arrange your devices. Turn off the power supply to these devices, and then unscrew them from the electrical box and change the order, then screw back into the box.
Now, you can get a cover plate in 11 finishes. And it will take you roughly 5 minutes to swap the position of your switches/outlets.
Solution 2: Update Your Devices
When you need a plate with a mix of cutouts, it narrows your options (rare combo plates often only come in white).
Updating one or two of your devices can solve your problem. Using the same example as above, let's say you have a rotary dimmer, duplex outlet and rocker switch.
Replacing the duplex outlet with a block outlet that fits a "Decora rocker" opening (same as for the rocker light switch), will result in the need for this combo cover plate, available in 17 finishes:
Block outlets are manufactured in more finishes than older duplex style outlets, so you'll have greater flexibility if you update your wall outlets to this modern style.
It takes a little more time, since you have to unwire the old outlet and re-wire in the new one (see instructions for swapping out an outlet here), but, in the end, you'll get the look you want.
Just do a little research (there are lots of installation videos on YouTube) and you can swap out a device without hiring an electrician.
While you're at it, you can also update to a rocker style dimmer to make finding your plate even easier - a triple rocker switch plate will be available at any hardware store that sells wall plates.
Solution 3: Create Your Plate with Inserts
For very specialized configurations - such as when a multi-device cover plate needs openings for phone and data jacks or needs a slot that's blank (closed off completely if there is no device in the slot), you can craft a custom plate with inserts.
An outlet & cable jack plate (shown in stainless steel below) is difficult to find and manufactured in very few finishes.
To get a greater variety of finish options, simply swap out the cable jack for a cable jack insert that fits into a rocker opening.
Not only does the duplex/rocker plate look more balanced with the cable jack insert, but you have much more options for matching the surrounding decor.
When you have a spot in your multi-gang electrical box that is no longer in use, you can get a plate that has a blank slot that covers the empty area behind it.
There are many configurations that incorporate blank positions (no cutout for a device - see center of plate above), but many times these are available in limited finishes (for example, the toggle-blank-rocker plate above).
Getting a configuration that has 3 openings and simply filling the unused one with a dummy switch or blank filler can broaden your options in terms of available finishes. You'll hardly notice the blank toggle filling the center position in the black cover plate:
For a box with a toggle, duplex outlet and toggle switch - a rare configuration - you'll only find a white plate to cover your devices (unless you re-arrange or update them, as explained in solutions 1 & 2 above).
Or, you can get a plate with a rocker opening in place of one of the toggle cutouts (for the above example, this plate), and convert that slot with a toggle insert for rocker openings.
Now, you can choose from more finishes, so you can get a cover plate that matches the others in the same room.
See other inserts and fillers to see all the possibilities for converting switch plate cover openings.
There you go - 3 simple solutions to finding the cover plate you need, in the finish you want, even when you think it doesn't exist.
Subscribe to:
Posts (Atom)