Wednesday, December 20, 2017

Replacing a Nu-Tone Light Vent & Heat Switch Cover

If your bathroom has Nu-Tone switches for controlling the light, vent and heat, you may have trouble finding replacement covers when you renovate the room.

The first thing you need to know is that the shape of the light, vent and heat control switches are one type of "despard" switch.

Find links to replacement parts below:

Nu-Tone Switches

To replace these old Nu-Tone switches, you need to get Pass & Seymour 15A ACD1 switches (which comes in white, ivory and brown).


Mounting Straps

Since these switches are mounted in metal straps, if you don't have the old hardware, you'll need a new despard switch mounting strap to install the replacement ACD1 light, vent and heat switches.


Despard Switch Cover Plates

The correct replacement cover is this 3 Despard Switch Cover Plate (available in over 10 finishes).

Light, Vent, Heat Switch Labels

The new covers don't have "LIGHT", "VENT", and "HEAT" imprinted on them.

But you can order separate Nu-Tone switch labels that can be affixed to the side of the switches. They come with a strong adhesive so they can easily be added to one side of your new cover.


Don't neglect your old switches and covers when updating a bathroom. You'll love the fresh look.

Monday, December 11, 2017

New Replacement Covers for Old Vintage Outlets {A Photo Guide}

Your home may have vintage style outlets that have long since lost their covers.

Find pictures of old electrical outlets and links to brand new replacement covers below.

Guide to Replacing Vintage Outlet Covers In Your Home


1. T-slot duplex socket

These vintage 250v T-slot outlets fit standard duplex covers.
However, this device has been banned since the '60s because of its lack of a ground or neutral. Rather than adding a cover to this outdated outlet, you should update to a more modern 125V outlet.


2. Sierra Triplex Receptacle

This 3-plug receptacle is an old Sierra Triplex Outlet.
New triplex covers are available in white and ivory.
Note that devices darken over time, so a new cover won't be an exact match in finish to an old device like this one.


3. Triple Plug

Here's another example of a triplex outlet that is built into the cover plate.
These are no longer manufactured, so a modern update should be installed in its place.
An oversized cover may be required to cover the cutout in the wall.


4. Sierra Electric Square Simplex Outlet

Find new square simplex outlet covers for these vintage Sierra Electric plugs.


5. Sierra Despard Outlets

This small 2-prong sockets may share a plate with switches as shown below.
These are examples of despard devices, which fit despard covers sold here.


6. Despard Convenience Outlet

Here is a 3-prong despard outlet. Fits the same despard outlet cover plates as the Example #5 above.


Have another vintage style outlet not shown here?
Share a picture with us and let us help you find a replacement.

Odd Jacks in Older Homes


You may find some strange looking "plugs" in your home that are actually phone jacks, like the 2 examples shown below.

4-Prong Sierra Electric Phone Jack

Buy replacement covers for 4-prong Sierra jacks.


4-Prong Bell Systems Phone Jacks

Buy covers for Bell Systems 4 prong jacks.


Looking for vintage cover plates for other jacks or old switches?
Check out our Comprehensive Guide to Identifying and Replacing Old Switches, Jacks, Outlets & Covers.

Wednesday, November 29, 2017

Updating Your Old Doorbell to Ring 2 - DIY Solutions

Updating your old doorbell & intercom speaker to a modern Ring 2 video doorbell system can be tricky since the Ring 2 is smaller than your old one.

What do you do about that large hole by your front door when you remove the old Nutone or TekTone doorbell intercom?

Buy a blank vintage doorbell cover that's large enough to cover your old speaker and screws directly into the old box. Then, mount the new doorbell right to the blank cover

See blank doorbell intercom covers here.

The aluminum doorbell cover plates can easily be drilled into, so you can mount your Ring 2 doorbell right to the cover.

Below, an old doorbell and intercom speaker was removed and the large hole was covered with this blank aluminum plate. The homeowner drilled holes into the cover to mount the Ring 2 doorbell and camera directly to the plate.


There are a variety of old doorbell styles and sizes, as shown here:


Follow these tips to determine the correct plate to convert your old doorbell to a new video doorbell:

Remove the Old Speaker
Turn off power to the doorbell.
Unscrew the speaker and remove any wiring that's attached.


Measure the Box
Measure the outside dimensions of the box as well as the distance between the screw holes where the old speaker was attached.

Note: screw holes are measured from the center of one hole to the center of the opposite hole.


Find the Right Size Cover Plate
You'll need the outside dimensions as well as the screw spread.

Covers are available in 2 sizes:

  • 6.38" H x 4.5" W
  • 7.5" H x 5.5" W

If your box is recessed in brick or other siding, make sure there's clearance for the cover plate. You may need to order a smaller size and use weather stripping or a gasket under the cover.


Find the Right Screw Spacing
NuTone doorbells typically have one of 4 screw spreads:

  • 3.75" (center to center)
  • 4.5" (center to center)
  • 5.25" (center to center)
  • 6-5/8" (center to center)
Screw spacing of the new cover must align with the box that's currently there.

Find Your Plate


Once you have the correct cover to act as your back plate, follow the instructions included with your Ring 2 doorbell, modifying them as needed to mount the video doorbell to the aluminum cover.

Installing another video doorbell model besides the Ring 2? 

If your doorbell model sits back into the wall rather than sitting on the surface as demonstrated above, you'll need a different intercom cover with a cutout for the recessed part of the doorbell unit.

Learn how to find a cover for all video doorbell models here.


Tuesday, November 21, 2017

Fix Gap Behind Switch Plates & Outlet Covers

Have a gap between your switch plate and the wall?

If you've removed wall paneling, have an electrical box that sticks out from your wall, or if you've replaced an old outlet with a bulky new receptacle, you may have a gap that exists between the cover and wall.

There are 2 ways to fill a gap behind a cover plate.


  1. Get a cover with a deeper edge.
  2. Add a filler between the plate and the wall.

Options are detailed below for fixing gaps in 4 sizes:

  • 1/16"
  • 1/8" (there are 3 solutions for a 1/8" gap)
  • 1/4"
  • 1/2"

FIX A 1/16" GAP:


Certain Deep Plates - Toggle, Duplex, Horizontal Toggles, Combination


Recommended for 1/16" Gap

If you have a very slight gap of 1/16" behind a cover for toggles, duplex outlets or a combination of toggle and duplex/horizontal toggles, use deep plates with a 5/16" edge bevel.


FIX A 1/8" GAP:


Add a 1/8" Depth Ring Behind Cover Plate


Recommended for 1/8" Gap

If you have a gap that's 1/8" and you'd like to keep your current switch plate, you can get a gap filler to sit between your cover and the wall.

These depth rings fill a 1/8" gap nicely, and are simple to install. Sizes from 1-5 gangs, standard, oversized & specialty sizes.

Get them at Kyle Switch Plates - search "EXDR".


Place an Extender Ring Behind Wall Plate

Recommended for 1/8" Gap & Wall Damage

If there's any wall damage around the electrical box that isn't covered by your current switchplate, you can fix a 1/8" gap and expand the wall coverage with a depth extender ring.

Note these only come in white and will be visible behind a standard cover.

Get them at Kyle Switch Plates - search "OVC".


Get a Deep Cover Plate

Recommended for 1/8" Gap

If you aren't particularly attached to your old cover, you can simply toss it and
replace it with a deep plate.

Deep plates have a larger bevel on the edges, so they reach back around your electrical box to meet the wall.

Standard covers have a 5/32" bevel, while deep plates have twice as much bevel: 5/16".

Deep rocker plates will fix a 1/8" gap.

There are many sizes - shop deep plates here.


FIX A 1/4" GAP:

Electrical Box Extenders for 1/4" Gap

Recommended for 1/4" Gap

Plastic electrical box extenders sit underneath your switch plate and fill a gap of 1/4".

They are single-gang only (for 1 device) and come in white, ivory or brown.

If your issue isn't a protruding wall box, but instead a bulky device, these extenders will lift your device 3/4" forward & out of the electrical box.

Get them at Kyle Switch Plates - search "6197".


Deep Blank Plates for Empty Electrical Boxes

Recommended for 1/4" Gap

Cover .25" of an exposed electrical box that has no devices with a deep blank wall plate. Also available for empty double-gang boxes.


FIX A 1/2" GAP:


Buy an Extra Deep Cover


Recommended for 1/2" Gap

For electrical devices that really stick out from the wall, an extra deep wall plate will do the job.

These deepest covers fix a gap up to 1/2".

Finishes are limited (white & stainless steel only), but if you have to fill a gap that's nearly half an inch, this is your best bet.

Single-gang only. Get them at Kyle Switch Plates - search "DP" or "extra deep".


FIX ODD SIZED GAPS:

Spacers can be used to adjust your electrical devices.

Combine spacers with the solutions above if you're still having issues getting the right fit.

These little green rubbery things go underneath your switch or outlet (between the device and the electrical box) to lift devices up (in increments of 1/8").

If a deeper cover plate is too deep for your situation (resulting in sunken electrical devices that don't reach the cover plate snugly) simply stack as many spacers under the devices as necessary to pull them up where you need them.


Wednesday, November 1, 2017

5 Simple Repairs to Get Your Home Holiday Ready

Is it just me or do we all have that one Facebook friend who posts countdowns to Christmas starting in July?

Many eye-rolls of mine can be attributed to these Christmas Countdown obsessed weirdos posters.

Nothing against Christmas, it's just that there's a time and place for Christmas, and for me, it doesn't even begin to begin until November 1st. Which, it just so happens, is today's date.

As the Winter season and all its festivities approach us, we get lured onto store aisles bursting with Christmas decor for the home. So enticing, isn't it? (Never mind the boxes and boxes of holiday decor already collecting dust in our attics.)

But, if you're prepping your home for party guests, you may want to start with some other fixes around your home. Have any DIY home improvement projects that are stuck at 90% done? I sure do!


  • That window sill repair that never got that last coat of paint.
  • The living room outlet we added that we cut too big a hole for.
  • Those loose switch plates in the kitchen backsplash tile.


I'll stop there. You get the picture.

Get Your Home Ready for Holiday Guests By Starting with Repairs


Want to know what keeps me from getting repairs done around my house? The hassle of not knowing how to fix the problem.

Here, I'll show you how to fix common electrical device & cover issues you may be having.

Issue: Too Big a Hole was Cut for a New Outlet


Fix: Oversized switch plates are made for this! They cover a larger portion of the wall around your switch or outlet, so too large of a hole in the drywall is no longer visible.

Get oversized wall plates here. Voila!


Issue: We added wainscot to our dining room and now the outlet sits too deep in the wall.


Fix: Pull the device forward with receptacle spacers (little rubber green thingies) that sit underneath the outlet. Stack as many as needed under your electrical device, then cover with your original cover plate.


Issue: Our switch plates are loose in our kitchen now that we added a tile backsplash above the granite countertops.


Fix: Loose plates (caused by switchplate screws that are too long) are the result of your tile installer not cutting enough space around your electrical boxes.

Get a bolt cutter and snip the screws down, or add spacers under your devices and cover with deeper bevel plates.


Issue: We removed all our wall plates to paint and can't find the dimmer knob.


Fix: Replacement dimmer knobs can be purchased online. Just be sure to get a good look at type of stem sticking out of the dimmer so you can be sure the new knob will fit.

In addition to replacement rotary knobs, you can get new oval knobs and split dimmer knobs.


Don't miss our decorative round dimmer knobs - great for dressing up your home for the holidays.


Issue: We removed an old doorbell and intercom speaker and need a way to cover the box.


Fix: Get blank covers for vintage doorbell systems after you've removed the outdated hardware.

We have a variety of sizes, so take measurements of yours (including the spacing between the screw holes for the cover to attach to the box) and contact us so we can set you up with the correct replacement.


Got any other issues pertaining to electrical components and their covers? Let us know so we can help you find a solution.

Now off to trim down some rocker switch plate screws.

Tuesday, October 10, 2017

Solutions for Oddly Spaced Electrical Switches

You may have a light switch and outlet that are close together, but mounted in separate electrical boxes, making the spacing between them odd.

Learn how to cover oddly spaced electrical devices below.

Visit our site for more switch plate problems & solutions

Problem #1: Adjacent Electrical Boxes


Solution A:


If your devices are in separate boxes that butt up against one another, you'll find that the spacing between them is odd.

A standard multi-gang cover plate won't be spaced properly to cover devices mounted like this:


And two separate single cover plates will be too wide to sit this close together.

Sometimes, desperate homeowners will cut a side off of two (or more) plastic switch plates to make a custom piecemeal cover. But the results are often quite unattractive.

A better solution is to pair together two narrow cover plates.


Solution B:


Another solution for the example shown above is to update the duplex outlet to a block outlet, and get a cover with widely spaced rocker openings.

Swapping out a duplex outlet for a modern block outlet is simple.


This cover plate's 2 rocker cutouts are spaced farther apart than on a standard double cover. The perfect solution for side by side electrical boxes with two switches or a switch and electrical plug socket.


Solution C:


You may have the same issue, but with multi-gang boxes. We have plates that are narrow on a single side to fix this problem:


Problem #2: Electrical Boxes in Close Proximity


It can look a little odd to have a bunch of single cover plates in close proximity with a small wall gap between them, like this:


You can order switch plates that have a section with no device opening.


You'll see that updating duplex outlets to block style outlets (shown above) not only gives you a modern look, but also gives you more options when selecting cover plates.

Problem #3: Electrical Boxes In Tight Spots


You can order an assortment of narrow, half narrow and other unique switch plates to fit within constraints such as door jambs that sit too close to your electrical devices.

For example, this homeowner was forced to cut the edges off several plastic switch plates to fit this tight spot next to the door:


A better solution is to get a plate that's trimmed on one edge. Cutout options for narrower plates are limited, so the devices will need to be updated as follows:

  • swap out the 2 rotary dimmers with rocker dimmers
  • update the toggle switch to a modern rocker switch
  • trade the horizontal toggles for a stacked rocker switch


A much cleaner look, don't you think?

Take careful measurements to determine what will work in your situation. At Kyle Switch Plates, we want you to find the solution that makes you happy. You can always order a variety of our specialized covers, then return the ones that don't work out.

Note: Device Position is NOT Fixed


An important thing to note is that your devices can be moved by simply loosening the 2 screws that mount them into the electrical box, pushing them toward the left or right, then tightening the screws to hold them back into the position you need them in.


This is a great way to get devices further from a door jamb, cabinet or other structure that sits too close to your device for a cover plate to fit.

Tuesday, September 26, 2017

Multi-Light Switch Plate & Outlet Cover Solutions

What to do when you can't find the configuration you need.


As a homeowner, you've no doubt removed a switch plate or outlet cover at some point - whether you were painting your walls or adding paneling, wainscot or tile.

And it's so simple, you've probably given it very little thought (except maybe keeping track of the screws while the plate was off the wall).

If you've lost a cover (you'd be surprised how many get thrown out when a professional painter is hired) or broken one (perhaps screwing the screws in too tight), you've likely run over to your local hardware store to find a replacement.

If that errand failed, you probably a rare configuration - meaning 2, 3 or 4 electrical devices that share a plate are lined up in an order that you can't find a cover for. (At least, you think you can't find a cover.)

The good news is...

There are several ways to solve this problem, which we'll detail below.

How to Get a Switch Plate with Device Cutouts in the Right Order


Solution 1: Re-arrange Your Devices


Often times, we get calls from customers who "almost" find what they need. For instance, a plate with the correct 3 cutouts, but they're not in the right order to match their switches or outlets.

Guest what - this is super, super common.

What many people don't realize is how easy it is to change the order of the devices in your electrical box.

If you have a duplex outlet in between a rotary dimmer and a rocker light switch, as shown here:


You may be looking for this triple cover plate configuration:


And we do carry this plate in 5 finishes (shown in ivory above). But if you're looking to match a room with specialty finish covers - for instance, dark bronze or satin brass - you're out of luck.

Unless, you simply re-arrange your devices. Turn off the power supply to these devices, and then unscrew them from the electrical box and change the order, then screw back into the box.


Now, you can get a cover plate in 11 finishes. And it will take you roughly 5 minutes to swap the position of your switches/outlets.

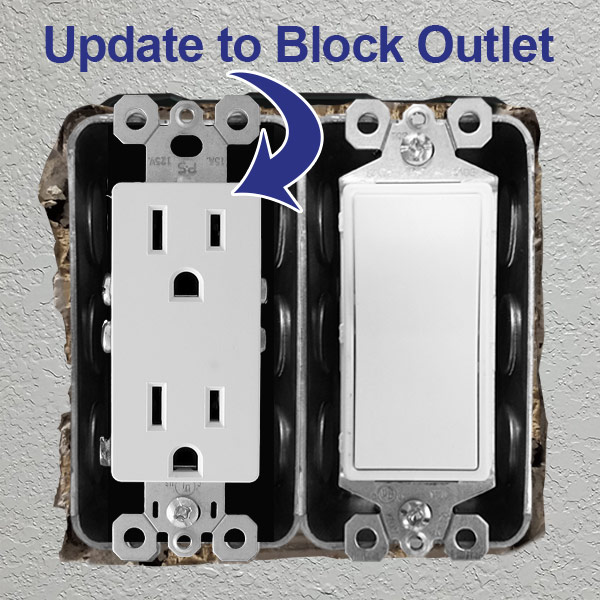
Solution 2: Update Your Devices


When you need a plate with a mix of cutouts, it narrows your options (rare combo plates often only come in white).

Updating one or two of your devices can solve your problem. Using the same example as above, let's say you have a rotary dimmer, duplex outlet and rocker switch.


Replacing the duplex outlet with a block outlet that fits a "Decora rocker" opening (same as for the rocker light switch), will result in the need for this combo cover plate, available in 17 finishes:


Block outlets are manufactured in more finishes than older duplex style outlets, so you'll have greater flexibility if you update your wall outlets to this modern style.

It takes a little more time, since you have to unwire the old outlet and re-wire in the new one (see instructions for swapping out an outlet here), but, in the end, you'll get the look you want.

Just do a little research (there are lots of installation videos on YouTube) and you can swap out a device without hiring an electrician.

While you're at it, you can also update to a rocker style dimmer to make finding your plate even easier - a triple rocker switch plate will be available at any hardware store that sells wall plates.


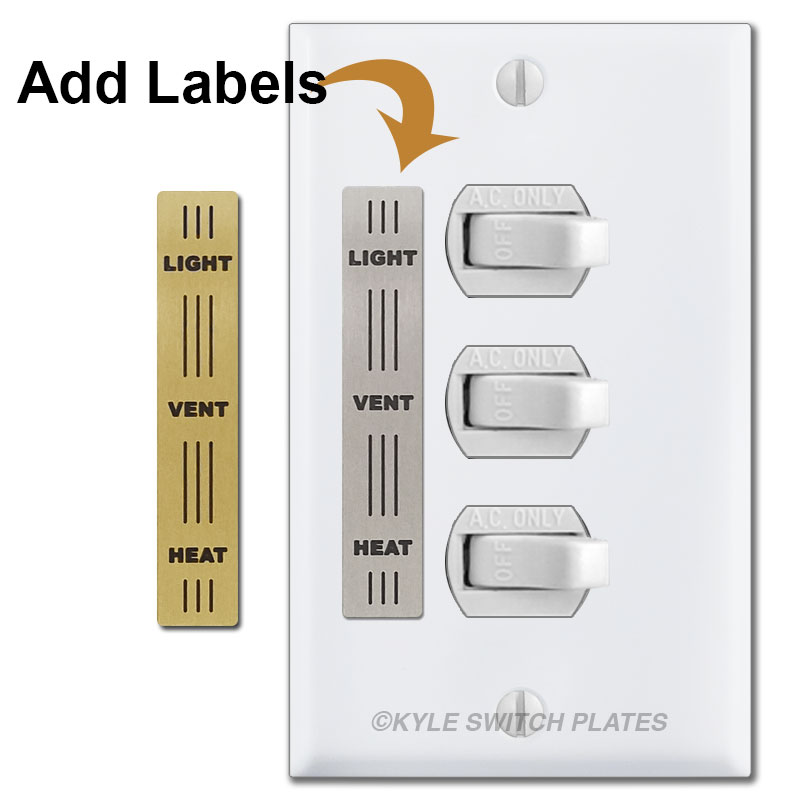
Solution 3: Create Your Plate with Inserts


For very specialized configurations - such as when a multi-device cover plate needs openings for phone and data jacks or needs a slot that's blank (closed off completely if there is no device in the slot), you can craft a custom plate with inserts.

An outlet & cable jack plate (shown in stainless steel below) is difficult to find and manufactured in very few finishes.


To get a greater variety of finish options, simply swap out the cable jack for a cable jack insert that fits into a rocker opening.


Not only does the duplex/rocker plate look more balanced with the cable jack insert, but you have much more options for matching the surrounding decor.

When you have a spot in your multi-gang electrical box that is no longer in use, you can get a plate that has a blank slot that covers the empty area behind it.


There are many configurations that incorporate blank positions (no cutout for a device - see center of plate above), but many times these are available in limited finishes (for example, the toggle-blank-rocker plate above).

Getting a configuration that has 3 openings and simply filling the unused one with a dummy switch or blank filler can broaden your options in terms of available finishes. You'll hardly notice the blank toggle filling the center position in the black cover plate:


For a box with a toggle, duplex outlet and toggle switch - a rare configuration - you'll only find a white plate to cover your devices (unless you re-arrange or update them, as explained in solutions 1 & 2 above).


Or, you can get a plate with a rocker opening in place of one of the toggle cutouts (for the above example, this plate), and convert that slot with a toggle insert for rocker openings.


Now, you can choose from more finishes, so you can get a cover plate that matches the others in the same room.

See other inserts and fillers to see all the possibilities for converting switch plate cover openings.

There you go - 3 simple solutions to finding the cover plate you need, in the finish you want, even when you think it doesn't exist.