Showing posts with label DIY. Show all posts

Wednesday, March 7, 2018

Simple Solutions for Replacing an Unusual Light Switch Cover

If you need to replace an old wall plate and you're having difficulty finding one that's the right configuration, there are a few simple ways to solve your problem.

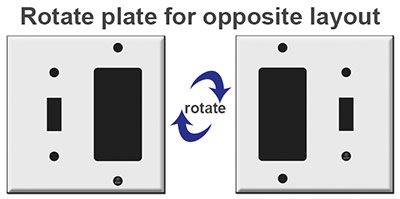
First, check out our wide selection of combination cover plates to see if we carry the one you need. (Keep in mind, plates can be rotated to reverse the order of the openings.)


Solution #1: Update Your Electrical Devices

The more devices you have that share a plate, the trickier it can be to find a cover. Especially if the devices all require different shaped cutouts.

This cover that has an outlet in between two rocker devices, is a rare plate that is only available in a singe finish.


Updating the duplex style outlet to a rectangular receptacle will result in all 3 devices using the same size cutout. If the center device is a horizontal toggle switch, you can update to a stacked rocker switch and get the same result.


Simply swapping out the center device (as shown above) results in the need for a triple rocker plate - a very common size available in many finishes.


Often times, updating 1 or more of your devices is the easiest solution when you can't find the cover plate you need.

Solution #2: Re-Arrange Your Electrical Devices

You can also change the position of your devices. This doesn't require any re-wiring and is super simple to do. All you need is a screwdriver.


Moving the duplex outlet from the center position to one side results in a more common configuration that will be easier to find and is available in more finishes.

If you're having trouble finding the right cover and you don't want to put in new devices, re-arranging the ones you have can be a great solution.

Shop combo plates to see if this solution will work for you.

Solution #3: Use Inserts to Build a Custom Configuration

Inserts fit into rocker openings and allow you to keep your devices the same.

Use inserts to convert a rocker opening to cover a toggle switch (shown below), a duplex outlet, cable or phone jacks, data ports or even to fill in as a "blank" if there's no device.


Shop conversion inserts & learn more about this solution at Kyle Switch Plates.

Wednesday, November 1, 2017

5 Simple Repairs to Get Your Home Holiday Ready

Is it just me or do we all have that one Facebook friend who posts countdowns to Christmas starting in July?

Many eye-rolls of mine can be attributed to these Christmas Countdown obsessed weirdos posters.

Nothing against Christmas, it's just that there's a time and place for Christmas, and for me, it doesn't even begin to begin until November 1st. Which, it just so happens, is today's date.

As the Winter season and all its festivities approach us, we get lured onto store aisles bursting with Christmas decor for the home. So enticing, isn't it? (Never mind the boxes and boxes of holiday decor already collecting dust in our attics.)

But, if you're prepping your home for party guests, you may want to start with some other fixes around your home. Have any DIY home improvement projects that are stuck at 90% done? I sure do!


  • That window sill repair that never got that last coat of paint.
  • The living room outlet we added that we cut too big a hole for.
  • Those loose switch plates in the kitchen backsplash tile.


I'll stop there. You get the picture.

Get Your Home Ready for Holiday Guests By Starting with Repairs


Want to know what keeps me from getting repairs done around my house? The hassle of not knowing how to fix the problem.

Here, I'll show you how to fix common electrical device & cover issues you may be having.

Issue: Too Big a Hole was Cut for a New Outlet


Fix: Oversized switch plates are made for this! They cover a larger portion of the wall around your switch or outlet, so too large of a hole in the drywall is no longer visible.

Get oversized wall plates here. Voila!


Issue: We added wainscot to our dining room and now the outlet sits too deep in the wall.


Fix: Pull the device forward with receptacle spacers (little rubber green thingies) that sit underneath the outlet. Stack as many as needed under your electrical device, then cover with your original cover plate.


Issue: Our switch plates are loose in our kitchen now that we added a tile backsplash above the granite countertops.


Fix: Loose plates (caused by switchplate screws that are too long) are the result of your tile installer not cutting enough space around your electrical boxes.

Get a bolt cutter and snip the screws down, or add spacers under your devices and cover with deeper bevel plates.


Issue: We removed all our wall plates to paint and can't find the dimmer knob.


Fix: Replacement dimmer knobs can be purchased online. Just be sure to get a good look at type of stem sticking out of the dimmer so you can be sure the new knob will fit.

In addition to replacement rotary knobs, you can get new oval knobs and split dimmer knobs.


Don't miss our decorative round dimmer knobs - great for dressing up your home for the holidays.


Issue: We removed an old doorbell and intercom speaker and need a way to cover the box.


Fix: Get blank covers for vintage doorbell systems after you've removed the outdated hardware.

We have a variety of sizes, so take measurements of yours (including the spacing between the screw holes for the cover to attach to the box) and contact us so we can set you up with the correct replacement.


Got any other issues pertaining to electrical components and their covers? Let us know so we can help you find a solution.

Now off to trim down some rocker switch plate screws.

Thursday, January 12, 2017

Mounting a Screwless Switch Plate - Your Step by Step Guide

My brother is a big of a freak about organization. In his kitchen, the cabinet doors and inlaid with glass, and as a result, all the china inside must be perfectly aligned at all times (this includes the patterns on the plates and bowls).

Another thing he's very particular about is the screws in the switch plates on his walls. All screws must match with the groove positioned horizontally.

Like this:

This, would drive him crazy:


Can you relate?

I have to admit, while I don't go around my house re-positioning my switchplate's screws, if I do remove and remount a plate (say, when painting a room), I also line up all the screws to match.

"Line Up the Switch Plate Screws" is a dangerous game to play, as you don't want to leave a screw too loose, but over tighten one and "snap!" - your plate cracks.

Alleviate all your switch plate woes with screwless covers. They're simple to mount, easy to clean and are a remarkable way to update the look of any room.

Screwless switch plates come with 2 plates - a mounting plate (or sub-plate) and the finishing screwless cover.

Here's How to Mount Your Screwless Lutron Switch Plate:

Step 1: Position the mounting plate on top of the devices in your electrical box.


Step 2: Screw mounting plate into the available screw holes in the devices using provided mounting screws.

Note that the screwless cover plate will snap into the slots in the mounting plate (highlighted in orange in the image below).


Step 3: Align cover plate over mounting plate and push until it fits securely into the mounting plate's slots/grooves.


That's it! Now enjoy your new, modern screwless wall plates.

Note: This guide shows a Lutron brand screwless rocker plate for 2 switches, but most screwless covers are mounted in a similar fashion.

Buy Lutron Screwless Wall Plates at Kyle Switch Plates.

Monday, January 26, 2015

Narrow & Short Switch Plates for Board & Batten Panelling


Like most Pinterest users, I find it impossible to scroll through the pins upon pins and not start visualizing my "new" house. That butcher block kitchen table I hate - I could paint it! That rusting over-the-toilet storage contraption could be replaced by floating wood shelves. We could cut a hole in the wall and create additional storage underneath our staircase! Sound familiar?

My latest and greatest revelation was that our kitchen wall needed board and batten. My husband was totally up to the task after getting a new saw for Christmas, so by New Years we'd turned this:


...into this:


Hmmm. We had initially had some disagreements on the height and style of board and batten to go with. I had gotten my way. And now I was hating it. I'm picturing farm animals grazing on the other side of this hideous fence that has become my kitchen wall. Ugh! Is it too late to change my mind?!?

Back to Pinterest to see what I've done wrong. OK, this can be salvaged. We just need to add some decorative trim pieces along each edge and a cap to the top. A day later we're comparing samples and once again we are not reaching an agreement on what looks best. Since I've steered us wrong thus far, I let him win. After all, his favorite was my second choice ;)

There's just one problem with this new plan - we had positioned the boards with just enough room for the switch plate and outlet cover. Adding trim would prevent the covers from going back on. Here you can see a comparison (on the left, we had not yet added the trim next to the outlet):


I had my husband notch out the very bottom of the trim so that a cover could slide underneath. This worked for the light switch as you can see here (we hadn't bought the new white plate yet so we used our old decorative one in the meantime). Since he only notched the bottom of the trim, you can't see it unless you bend down and look upward.


For the outlet, we loosened the screws on the device to push it as far right in the electrical box as we could get it. (They are made to be slightly adjustable side-to-side.) Then, we added a narrow switch plate that was just wide enough to cover the right side of the hole we had cut out of the board. My husband notched the trim to fit the left side of the plate. And, problem solved:


I've noticed people come up with many creative solutions for adding board and batten around light switches and outlets. Some people choose to create a gap in the trim piece or extend the size of the boards to incorporate the devices. I wanted a seamless look which is why I carefully planned out the spacing of my boards. But, everything was thrown off when we added the extra decorative pieces. 

Whether your project has taken an unexpected turn like mine, or you didn't realize how much space your wallplates would take up around your switches (a common mistake!), you can use narrow cover plates to complete your board and batten.

I decided to paint our new metal switch plates so they would match the board and batten perfectly. Here's a nice tutorial for painting switch plates.


If you run into similar problems when installing board and batten, cabinets or even a kitchen backsplash or island, you can buy narrow switch plates which aren't as wide as standard ones, or you can buy short switch plates which aren't as tall as standard ones. 

In the end, we love our new board and batten kitchen wall. 


Of course, once this was complete I had to paint the kitchen table and door. Which leads into my next project - staining those chair legs black.


Thursday, May 29, 2014

Complete Your Kitchen Remodel Faster with This Essential Tip

shop switch plates & outlet covers

You've selected the tile floor, the granite counters, the perfect wood cabinets and a fabulous backsplash. You may have purchased all new stainless steel appliances to match your new high-end look. From the moment you decided to do your kitchen remodel you've been anticipating the end results - the feeling of walking into your kitchen every morning and loving it. Am I right?

But, there's a good chance you left one essential item of your to-do list - new switch plates. It's so easy to overlook this detail. After all, before the remodel there were white plates on white walls or plain tile. But now, against the gorgeous grain of your new granite countertops and rich tile backsplash, those white switches, outlets and cover plates stick out. And they're awful!

New Switches, Outlets and Cover Plates will Complete Your Kitchen Remodel


You can easily avoid this disappointment by planning ahead and purchasing matching devices and wall plates in advance. That way, you won't have to live an extra week or so with the old tacky plates in place once the rest of your kitchen is complete.

If you head down to your local hardware store you may find that their selection is limited. The best way to find all the parts you need is to shop Kyle Switch Plates - your order will ship out in 1-2 business days (sometimes even the same day) and the flat-rate shipping means you can order as much as you want without outrageous shipping costs.

At Kyle Switch Plates, you'll find outlets and switches in a vast array of colors - including black, ivory and gray which are popular in kitchens. You can also order switch plates and outlet covers in 17 different finishes - stainless steel, black, oil rubbed bronze, brass and more. We keep everything in stock and ready to ship from our Livermore, California warehouse.

If your newly renovated kitchen has stainless steel appliances, you'll love the look of gray switches with stainless steel plates. If your new granite counters have a lot of black, deep brown and tan shades, you can go with black switches and faceplates or do brown switches and outlets with either brown or dark bronze cover plates. Play around with different finishes to find the look that appeals to you.

Don't forget to budget for new switch plates!

When budgeting for your project, take into consideration how your old switches and faceplates will look with your new color scheme. A single switch or cover plate isn't expensive, but it can add up when you're re-doing an entire room. Determine what color will work best in your kitchen, and calculate the cost of ordering replacement electrical devices and covers. See our post on Replacing Switch Plates for a handy printout that will help you avoid order mistakes. We just hate to see when someone forgets 1 plate or outlet and has to wait for a 2nd order to arrive.

Shop Kyle Switch Plates to order new switchplates and matching switches and outlets for your kitchen. It will be the perfect finishing touch on your project - we guarantee it.

#remodel #kitchen #kitchenremodel #switchplates #electricaldevices #homedecor