Tuesday, December 4, 2018

How to Easily Create a Custom Switch Plate


If you have any switches or outlets in your home that don't have a cover plate - because you can't find one that fits - you're in the right place.

This post goes over how to create any configuration wall plate, without breaking the bank.

You may need a particular configuration that you can't find. Or, you may be able to find it, but not in the finish you desire.

The first question to ask is this:

Can you re-arrange the devices?

Your electrical devices are currently mounted into the box in a particular order.

But they don't have to stay in that order.

If you can find a cover that has the correct openings in a different sequence, unscrew one or two of your devices & swap them around.

This is the fastest and simplest way to get a plate in the correct configuration.

To be safe, always turn off power to the devices before tampering with them.

Shop combination covers here to find the plate you need or one that will work if you re-arrange your devices.

Another solution is to update one or more of your devices.

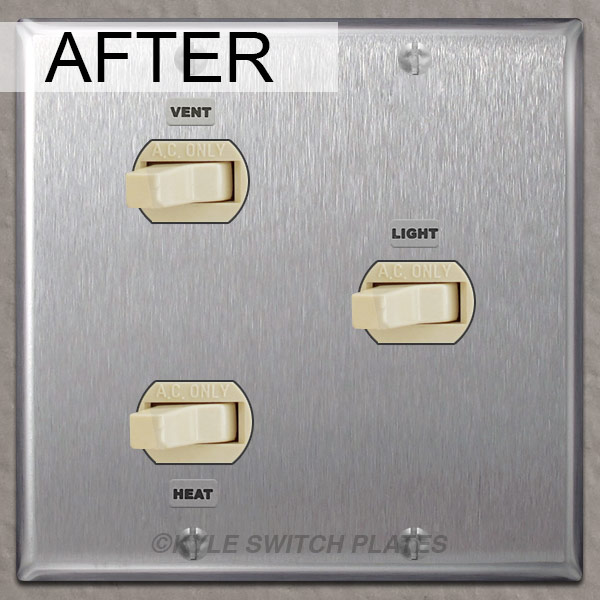
For example, if you have a duplex outlet among dimmers or switches and can't find the cover you need, update the duplex outlet to a block outlet.

Change duplex outlets to block outlets.

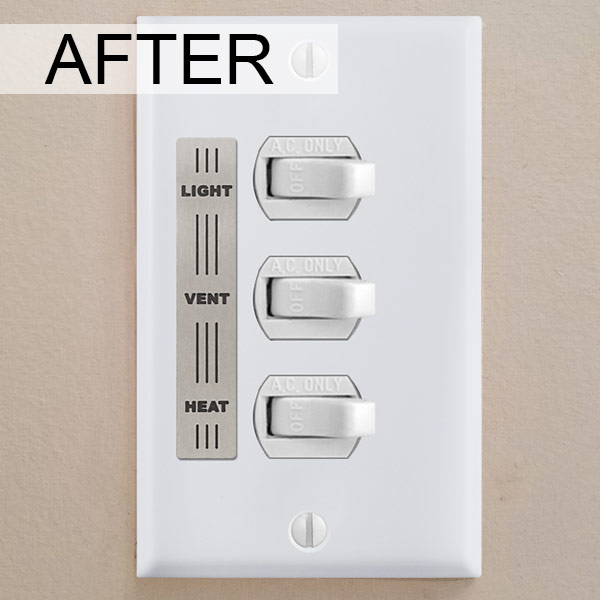
Older toggle switches can be updated to modern Decora rocker paddle switches, which are now a more common wall plate opening.

Change toggle switches to modern rockers.

Updating a device's style is another simple solution that will only take a few minutes.

Note: always cut the power to the switch or outlet at the circuit breaker before messing with it to avoid electric shock. Always hire an electrician if you don't feel comfortable handling electrical components yourself.

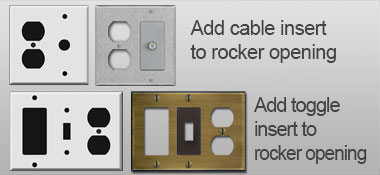
Finally, you can create a custom configuration with switch plate inserts.

Since the larger, rocker openings are so common and available in many finishes, converting them with inserts is a great way to get the custom plate you need.

Inserts typically fill rocker openings and have a cutout for a smaller device.


At Kyle Switch Plates, our most popular selling inserts are for toggle switches.


Toggle inserts sit under any wall plate's rocker opening to allow for a toggle light switch to go there instead.

For example, suppose you need this combo plate, but in a finish that's not manufactured, such as black:


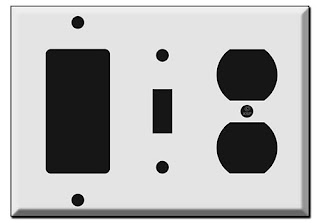
Simply find a plate that has a rocker opening instead of toggle in the center, and add an insert in that spot:

Plate with rocker instead of toggle in center.

Toggle insert for rocker opening.


Inserts are easy to use and offer a great solution to creating your own custom wall plate.

Kyle Switch Plates carries a variety of switch plate inserts in white, brass, ivory, gray, silver, brown, bronze, black and more.

Use them to convert cover plate openings to blanks, toggles, cable/phone jacks and more.


Tuesday, November 13, 2018

Cover an Outlet when Bottom is Tiled & Top is Drywall

If you've added wall tile that ends mid-way up the wall (but not high enough to clear the top of your light switch or outlet), you'll run into a problem when you go to re-attach the cover.

Wall tile stops halfway up the electrical box.

You'll find 2 problems when trying to add the cover plate:
  1. The outlet will be sunken down into the cover.
  2. There will be a gap between the drywall and the top half of the cover.
Which, if you're reading this, you probably already know!

Continue reading to...

Learn how to cover an outlet when the bottom is tiled and the top is drywall.

*****Important Safety Note: Always turn off power to your electrical devices at the circuit breaker prior to making adjustments.*****


Solution 1: Use Spacers & An Outlet Cover Extender Ring


This 2-part solution involves lifting the outlet with spacers and filling the gap behind the cover with an extender ring. 

First, use spacers underneath your outlet, stacking however many are needed to lift it up to be flush with the tile surface.

Spacers fix sunken electrical outlets when adding tile, board & batten, paneling or another surface to your walls.

Then, place a half size gap extender ring on the tile ledge (going around the top of the electrical box) and tighten the cover over it.

Half-size ring wraps around top of standard electrical box.

These gap filler rings are 1/8" thick. You may stack them to match the depth of your wall tile.

The above solution is great when your tile ends half-way up your outlet box. But if your tile ends in a different spot, the next solution may work better.

Solution 2: Use Support Ring with Gaskets


Add a single-gang support ring underneath your switch or outlet. Like the green spacers in the above solution, this brings the device up to match the surface of the tile.

Your device will mount through the support ring into the electrical box - extra long screws may be required.

Cut foam gaskets to fit above the tile, and stack them to the depth necessary to fill the gap between the ring and the wall.


You can use caulk to seal around the edges along the top portion (over the gaskets). Then, carefully attach the cover plate.

Ideally, you'll want to plan ahead to be sure tile doesn't end mid-way up an electrical box. End your tile below or above it, or move the box up before tiling. (Be sure the allow extra space for the cover plate, which extends beyond the box in order to cover it fully.)

There are no perfect solutions for electrical devices that sit on top of both tile and drywall. But, these 2 options are better than leaving them uncovered altogether  or exposed due to a large gap behind the cover.

Wednesday, October 24, 2018

Oak Leaf Switch Plates & Outlet Covers | Fall Decor

We've got pumpkins on our porches, spiderwebs in our windows, skeletons dangling in our trees, and witches cackling above cauldrons all throughout our neighborhoods.

Halloween is just a week away and I can tell that I'm not the only one getting carried away with my seasonal home decor this year.

Fall is in full swing and if you really want to up your decorating game, consider swapping out your light switch and outlet covers in a bathroom or kitchen.

We just love these gorgeous wall plates with Oak leaves that we handcraft right here in our studio at Kyle Switch Plates.

These covers are perfect if you plan to host any gatherings this Fall. So if you're hosting the family for Thanksgiving or having a group of pals over for a Friendsgiving dinner, these plates are for you.

Add them to your guest powder room to compliment your Fall hand towels, spiced candles and other Autumn-inspired bathroom decor.

It only takes a minute or two to remove your old cover and make a huge impact with fresh, new switchplates embellished with decorative leaves. Choose silver, brass, gold or copper leaves on top of a variety of switch plate finishes.


Lots of wall plate configurations available. Shop all of Kyle's handcrafted decorative wall plates for more designs.

Thursday, October 4, 2018

How to Label Your Light Switches - 3 Simple Solutions

Honestly, there are spots in my home where there are only 2 switches side-by-side, and after 8 years I still get them mixed up.

Doesn't seem possible, but there's a few spots that just really trip me up. Still.

Recently, I was out and about when I came across this:


Why had it never occurred to me before to just label those tricky light switches?

Well, obviously I don't want to throw masking tape up on my wall and ruin the ambiance in my home.

And I'm guessing you don't want to either.

Here are 3 ways to label your light switches (and keep them looking nice).


1. Engraved Light Switch Tags

Label your ceiling fan, garbage disposal or other switch with a personalized wall plate label tag.


These custom engraved switch plate labels are available in silver and gold and can be labeled with up to 22 characters in your choice of 3 fonts.

They come with a strong adhesive backing - just peel and stick to any smooth cover plate.

If you need more than 22 characters to label a switch, you can get larger wall plate labels here.

2. Switch Plate Label Packs

These light switch labels are sold in sets and come with all kinds of useful identifications for your switches.


Label ON vs OFF or INSIDE vs OUTSIDE lights. Label your basement, pool, porch, hall, etc.

They can held in place by the plate's screws, and if you ever change the cover plate, you can still use the label.

They come with adhesive tape to help hold them in place. Simply don't peel the backing off the tape if you'd like them to be reusable.

To install, remove the screw above or below the switch you'd like labeled, position the tag over the screw hole, and re-attach the screw.

These label packs are available in silver, gold, brass and copper.

3. Custom Printed or Engraved Switch Plates

For a really professional look, wall plates can be special-ordered with engraved or silkscreen printed labels.


These plates are labeled by the plate manufacturer, and take about 6 weeks to be produced.

This is the most expensive way to label your plates, so we recommend this method only if you need a large quantity, such as for a hospital, school or business.

Learn more about the differences between engraving and screen printing & how to order custom plates here.

Thursday, August 30, 2018

How to Replace a Low Voltage GE Switch & Relay [Install Tips]

Update your old GE switches with modern low voltage parts.


If you have a GE low voltage light system and one of the lights in your home isn't working, you'll either need to replace the switch or the relay that's connected to the switch.


First, use this guide to determine which part needs to be replaced:

(See our GE troubleshooting tips for additional help with your system if multiple lights throughout your home (or ALL the lights) aren't working.)

*Old vs New Switches & Compatible Brackets:

See the difference between an old switch & new switch:


Here are some examples of old switches in old brackets.
New switches (with the black housing) should NOT be forced into these old rectangle brackets because the new switches are larger than the old ones.


If forced into an old bracket, the new switch can get pinched, malfunction and eventually burn out the connected relay.

New switches are only compatible with diamond brackets.
However, brackets aren't necessary when you purchase New Style Covers.

Replacing a Switch:

GE low voltage light switches have been updated since the 1950's.

The new switches have 2 square buttons - you press one side to turn the lights on and the other side to turn them off (instead of rocking the switch one way or the other to control the lights).

If you need to replace an original switch, you'll need to replace the cover plate (and any other switches in that plate) as well.

With Snap-In replacement covers for GE switches, you can install new switches without buying the new diamond-shaped brackets to mount them in the junction box.

The new switches snap into these cover plates, eliminating the need for a bracket.

Note: Snap-In New Style Covers are only available at:

Replacing a Relay:

Each switch is connected to it's own relay (unless two switches have been wired together to a single relay for 3-way functionality).

New GE relays can be purchased here. The two most common replacements are the RR7 and the RR9. Take a look at your old relay and pay attention to the number of wires coming out of the top.

If your old relay has 3 wires or is labeled as RR2, RR3 or RR5, you will replace it with the new RR7 relay.

If your old relay has 4 wires on top (one of which is for a pilot light - typically yellow) and is labeled with part numbers RR4, RR6 or RR8, your replacement will be the RR9 pilot light relay.

GE System Wiring Info:

Here is an overview of the wiring in an older home with a GE low voltage lighting system using an RR7 relay:


Back of GE low voltage switch:
The back of a new GE switch has prongs labeled 
"RED ON", "BLK OFF", and "COMMON."

TO REPLACE A SWITCH, use the quick connectors that come with the switches to connect:
the red wire (from the relay) to "RED ON" prong
the black wire (from the relay) to the "BLK OFF" prong
the white wire (coming from the transformer) to the "COMMON" prong


(For Pilot Light switches, there is an additional prong between the prongs for the black and red wires. Connect the yellow pilot light wire there.)

TO REPLACE AN OLD RELAY, connect the wires in the relay panel to the replacement relay as follows:
  • old red wire to new red wire
  • old black wire to new black wire
  • old white (or other color) wire to new blue wire

Where are these wires coming from?
As shown in the GE system diagram above:
The red wire runs from the relay to the "ON" terminal on the switch.
The black runs to the "OFF" terminal on the switch.
The blue connects to the system's rectifier.

The side of an RR7 relay has 2 brass screws, which are used to connect wires running to the circuit breaker and the lamps.

Look on the bottom of the relay, and under the screws you'll see 4 holes.


For a standard application, connect the circuit breaker wire into hole 1 or 2 on the bottom of the relay. Then connect the wire going to the lamp into hole 3 or 4.
If the same breaker is used to power multiple rooms (for example, your dining room & kitchen), you'll wire multiple relays together.


For the 2-relay setup shown above, the circuit breaker wire goes in the first hole of relay number 1.

Another wire connects the relays (from the second hole of relay one to the first hole of relay two (see diagram).

The lamps are wired to hole #3 of each respective relay.

These instructions do not cover all details or variations in equipment nor do they provide for every possible contingency that may be met in connection with the installation, maintenance or operation.

Information provided is subject to change without notice.

Kyle Switch Plates is not responsible for any errors or omissions.

Shop Replacement Parts for GE Low Voltage Lit Homes

Get a GE Wiring Diagram for all types of GE low voltage switches - free with any purchase on www.kyleswitchplates.com.

Other Examples of Old GE LoVo Switches:

Your vintage switch may look like any of these examples:

To replace switches from the top row (labeled "Standard Switches"), get new ge switches here. These switches go with the RR7 relay.

To replace switches in the bottom row, get new ge pilot light switches. These switches connect to RR9 Pilot Light relays.

Note, the locking RKS-6 and RKS-8 have key slots and require a key to turn the lights on and off. If you want to continue to use a key to adjust the lights, you can find replacements here:
Buy key switches for GE low voltage.
Buy pilot light key switches for GE low voltage.

Don't see your switch shown?

See all vintage GE switches & replacements for additional types of vintage switches.

OR, you may have another brand of low voltage system!

Check your relays to look for other brands such as Pyramid, Sierra, Touch Plate or Remcon. Use our Low Voltage System Identification Guide to help find your brand and replacement parts.

Wednesday, August 22, 2018

Replacement Covers for NuTone Light, Vent & Heat Switches [with labels]

If you're updating a bathroom and want to replace your dingy old NuTone light, vent and heat covers, we'll show you how.

Here are three examples of NuTone switches & covers commonly found in bathrooms:


1. Vent, Heat, Light & Night Light:

This nickel NuTone cover fits over 4 horizontal toggle switches that control the bathroom fan, lights and overhead heater.


Black imprinting labels each of the 4 switch functions.

Note that there are different switches shown in plate #1 and plate #2 above. The white switches in example 1 are larger than the ivory switches in example 2.

Example 1's switches are horizontal toggles and fit the same switch plate opening as a duplex outlet for 2 plugs. Learn more about horizontal toggle covers in our post here.


You can buy new covers for 4 horizontal toggles without labels printed on them. Choose from a variety of other finishes or get stainless steel to keep the same look as the original cover.

Note: this is the same cover that is used for electrical outlets.

To add labels to the switches, get adhesive NuTone switch labels and stick them to the plain cover plate.


NuTune switch labels are available in antique silver to match stainless steel plates, but also come in antique brass and can be added to covers in any finish.

The small metal rectangle labels are 3/8" high x 1/2" wide and come with a strong adhesive backing. Simply peel and stick to any wall plate.

This bathroom went through a recent update and the new switches & cover look great:


2. Double-Gang Vent & Heat:

Example #2 is a NuTone HS-94S with 2 stacked switches on the left (labeled VENT & HEAT), and a standard toggle light switch on the right.


Horizontal Toggles & Standard Toggle Light Switches

A replacement plate with no printed labels looks like this:


Vent and heat labels can be added to replacement covers.


3. Single-Gang Light, Vent, Heat:

Example #3 is a NuTone system with 3 stacked switches labeled LIGHT, VENT & HEAT.


These 3 small switches (despard switches) are sold individually and installed in a metal mounting bracket.

NuTone switches like these fit triple despard cover plates.


Since these replacement covers don't have labels, adhesive ones can be added to identify which switch does what.

One option, is to get these NuTone switch vent & heat labels, and stick them to the side of each switch. (These are the same stick-on labels from example one, but in the brass finish.)

Satin brass cover shown with ivory switches and antique brass labels.

Another option is to add this peel-and-stick label for NuTone switches. Which is what this homeowner chose when doing renovations to a basement bathroom.


You can add light switch labels to the left or right of despard style switches.

4. Light Vent Heat (2-Gang Scovill)


Here are the NuTone Scovill switches without the cover:


Note that the switches are in a large square metal strap with 4 screws holding it into the junction box. The screw holes for attaching the cover plate are in the center of the left and right edges of the mounting strap.

If you only need to replace the cover, you get this NuTone Scovill Light Vent Heat Switch Cover.


You can see that the cover (available in ivory and white) doesn't label the switches. You can adhere these light vent heat switch labels to the front of the new plate. Or, create your own method for labeling them.


If you need to replace the switches (despard switches like these), you'll mount them in new metal straps, and the cover plate will be slightly different.

Below, you can see the new despard switch straps hold switches for a single gang, or single slot in the junction box.

The cover plate screws into these straps at the very top and bottom:


You'll mount the switch on the right in the center of the strap, rather than up at the top. You'll need this new cover plate if updating your switches and straps.
This cover is available in stainless steel (shown), polished chrome, white, ivory, satin brass & black. Kyle Switch Plate's light vent heat labels for NuTone covers can be added either above or below each switch.