Tuesday, February 26, 2019

Creating Accessible Light Switches in Your Home

Easily make residential light switches more accessible for people in wheel chairs as well as for shorter individuals such as children.

Adding a light switch extension handle is quick and makes it possible for those who can't reach a standard height light switch to gain independence.

Extension handles can be used on toggle switches or Decora rocker switches as well as with compatible dimmer switches and fan controls.

EXTENSIONS FOR TOGGLE SWITCHES & DIMMERS:

Toggle switch extensions are held in place with screws and allow the switch to easily be toggled up or down to control the lights from a seated or low position.


They don't require any additional holes be drilled in order to be installed. The screws used to attach the handle replace the screws that would otherwise hold the switchplate to the wall.

To use with a toggle dimmer switch, it's best to be sure the dimmer doesn't have a preset lever to the side of switch, as it won't be accessible behind the extension handle.


See how the handle prevents access to the dimmer lever:


HANDLES THAT REACH DECORA ROCKER DEVICES:

An adapter can be added to the above toggle handle to make it compatible with Decora rocker switches and dimmers.


When you use the adhesive rocker adapter, you'll stick the handle to the switch directly rather than using screws to mount to the wall plate.

There are many styles of dimmers that fit rocker wall plates. If you intend to use your handle with a rocker dimmer, be sure it's like examples #3 shown below.


Examples #1 & #2: The small slider knob and switch underneath make it difficult to add an accessibility handle.

Example #3: The rocker style paddle switch on this dimmer is only slightly narrower than a standard Decora rocker switch. You can position the adhesive adapter onto the switch while leaving the side dimming lever unobstructed. You can purchase these compatible dimmer switches here.

Now you can make it convenient for toddlers, small children and disabled residents to access the lights themselves while living in or visiting your home. Add to a main residence, guest house, in-law unit, or vacation rental property.

Thursday, February 14, 2019

A Guide to Despard Switches, Wall Plates & Mounting Brackets

Find info about Despard electrical devices, how to install them, and which plates cover them. Plus, links to purchase new parts if you're looking for an update.

Despard Electrical Devices:


Switches:
-15A & 20A
-120/277V
-single pole & 3-way
-fit 1-3 switches in a single gang of box
-may have the brand "Leviton" etched across the switch

Pilot Lights:
-1/25W
-125V
-illuminates when controlled lighting is turned on

Outlets:
-15A
-125V
-sold with or without grounding wire

Shop Despard Switches & Outlets

Leviton Toggle Switches:


Your Despard toggle light switches may have the brand Leviton etched on the tip of the toggle.


Other common manufacturers are Bryant and Sierra.

Pass & Seymour now manufactures them, and replacement Despard switches can be purchased here.

Nutone Light, Vent & Heat Bathroom Switches:


Bathroom light, vent and heat systems by Nutone also use Despard switches, straps and covers.


If you're looking for parts like this, see our post about Nutone bathroom switch & cover replacements.

Low Voltage Switches with Despard Shape:


Sierra low voltage systems also have Despard style light switches -  3A, 24V tigger switches.


These low voltage Sierra switches (now manufactured by Pass & Seymour) mount with the same bracket & covers as standard 120 volt Despard switches.

Shop replacement Sierra parts here.

How to Mount Despard Devices in an Electrical Box:

Electrical Box Straps:


Unlike standard toggle light switches, Despard toggles need extra hardware to mount into an electrical box.


The brackets (also called straps) are made to hold the switch vertically or horizontally in the box.

Note that the vertical strap holds only 1 switch per "gang" (or slot in the box), while the horizontal strap holds up to 3 switches.

The horizontal strap can hold 1, 2 or 3 switches. 
Simply leave the slots that you don't need empty.

Your wall plates may be positioned vertically (as shown above) or horizontally (as shown below), which you need to note before choosing a new bracket for these switches.

Rotated vertical & horizontal Despard wall plate installations.

The switches are positioned in the straps to flip side-to-side (in horizontal straps) or up/down (in vertical straps) if the wall plates are installed on the wall vertically, like this:

Vertically installed wall plate with 3 horizontal switches.
Uses horizontal mounting strap.

Buy horizontal straps and vertical straps at Kyle Switch Plates.

Attaching Switches to Straps:


To install the switch (or outlet) into the Despard strap, note that the curved edge of the strap will face up (outward when screwed into the electrical box).

On one side of the strap's opening for the switch, there is a lip that fits into the casing on the side of the device.


Position the strap over the device and press down firmly on each side until device is fully inside the opening.


Now you need to secure the device into the strap using a screwdriver.

Place the end of a screwdriver into one of the slots to the side of the device and twist to bend the strap inward.


The metal should now be pressed up against the device, holding it securely into the strap.


Once all your devices are snug in the strap, you can mount the strap into the electrical box and cover with the coordinating wall plate.


Covers for Despard Switches & Outlets:


As mentioned above, wall plates for Despard devices may be installed horizontally or vertically on the wall.

Left: Wall Plate mounted horizontal.
Right: Wall Plate mounted vertical.

Despard Plates for Horizontal Straps:


Despard Plates for Vertical Straps:


There are a variety of configurations for Despard electrical components.

Shop Despard Switch Plates to order replacement covers online.

Kyle Switch Plates sells new Despard lighting switches, outlets, mounting hardware and cover plates. Wall plates are available in a variety of specialty finishes & are made in the USA.


Tuesday, February 5, 2019

How to Replace a Cover for an Outlet in the Floor


Floor outlets are so convenient and offer a safe way to get access to power in the center of a room.

You can use them to plug in accent lamps in your living room or to power your laptop from the comfort of the couch without the tripping hazard of running an extension cord to the nearest wall.

If a floor box cover is missing or damaged, you may be looking for a new replacement cover. Or maybe a new floor is prompting your search for a cover in a different finish. Maybe just a round cap is missing and you want it replaced to put your home on the market.

Replacement covers can be very difficult to find. That's because many floor outlet manufacturers don't sell the covers apart from the floor boxes.

Here is a Guide to Replacing a Cover for an Outlet in the Floor:


STEP 1


First, you need to identify the brand of your floor box. Common brands include Pass and Seymour, Leviton and Allied.

Leviton's brand is often stamped close to the spot where the outlet is screwed into the box.


If you have Leviton brand, you can purchase new round screw-in caps to cover the plugs, but the cover itself isn't sold separately. Go to Step 2.

Pass & Seymour's brand name may be stamped on the front or back of the receptacle or down inside the box. It may simply say "P&S". You may need to cut the power, unscrew the receptacle from the box and flip it over to see the brand markings.


Pass & Seymour doesn't sell caps or covers apart from the boxes. You'll need to purchase an entire new floor box kit.

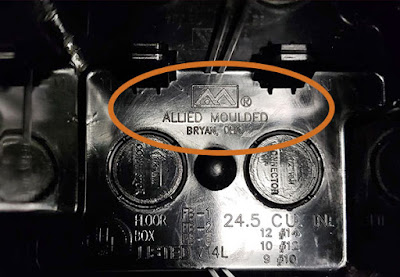
Allied Moulded's brand name may or may not be on the receptacle. You might find it down inside the box, as shown here:


Allied sells new covers to replace damaged or missing ones. Keep reading to find the correct one.


STEP 2


Next, look to see if you have a single round outlet or a duplex outlet.

It's important to note if there is a single plug or 2 plugs in the box.

Note that in addition to having either 1 or 2 caps, the replacement cover may have different spacing between the screws as well as different cap sizes.

Also - the cap sizes are not only different for single vs duplex outlets, but they also vary in size by brand:


If you have Leviton brand and need just the replacement caps, note that the single round caps are larger than the duplex caps.


Order replacement Leviton caps here:


STEP 3


Finally, take measurements to ensure you are looking at the correct replacements.

Measure 3 things:

  1. the size of the old plate or the uncovered box
  2. the screw spacing (where the cover screws into the box or device)
  3. the cap (or cap opening if cap was misplaced)

Each brand makes covers and caps in slightly differing sizes. The screw spacing is different as well.

Again, note that:

  • Allied sells the covers separately (for their boxes only - see links below)
  • Leviton sells the caps separately; small or large (for their covers only)
  • Pass & Seymour only sells the entire floor box kit.


Allied Moulded:

  • Single Cap Size: 1.47"
  • Single Outlet Cover: 5.125" H x 3.5" W
  • Screw Spread: 4-1/16"
  • Buy cover only in brass or nickel.

  • Duplex Cap Size: 1.46"
  • Duplex Outlet Cover: 5.125" H x 3.5" W
  • Screw Spread: 4-1/16"
  • Buy cover only in brass, bronze or nickel.

Leviton:

  • Single Cap Size: 1.75"
  • Single Outlet Cover: 5.5" H x 2.75" W
  • Screw Spread: 2-5/8"

  • Duplex Cap Size: 1-7/16"
  • Duplex Outlet Cover: 3.75" W x 4.5" H
  • Screw Spread: 3-13/16"

Pass & Seymour:
  • Single Cap Size: 1.74"
  • Single Outlet Cover: 4.87" H x 3.25" W
  • Screw Spread: 3-13/16" 

  • Duplex Cap Size: 1.45"
  • Duplex Outlet Cover: 4.87" H x 3.25" W
  • Screw Spread: 3-13/16""

Shop all floor box outlets & replacement covers at Kyle Switch Plates.