Showing posts with label switch plate solutions. Show all posts

Tuesday, March 19, 2019

Centering a Switch in a 2-Gang Electrical Box - Here's How


For whatever reason, you have a 2-gang electrical box with only one switch or outlet, and you'd like it to be centered.

The solution for covering a single device in a double box depends on what type of box you are covering.


Note the location of the screw holes on each box type as well as the dimensions of the boxes.

We'll now look at how to center a device in each of these types of boxes.

2-GANG STANDARD BOX:


A standard box has tabs that the electrical devices mount into.

Typically, you would install your switch on one side or the other, and cover it with a plate that has 1 blank side.

There is no place to mount the device in the middle, so in order to do so in this type of box, you'll need a specialty switch plate that the device will mount to from underneath.

Then, the plate mounts to the box in the standard way.


Shop these links to get a cover for this box type, based on what type of device you're installing (rocker switch, toggle switch or duplex outlet).


  1. centered rocker cover for a 2-gang box (for rocker switch or block/GFCI outlet)
  2. middle position toggle switch cover for 2-gang box (for toggle switches)
  3. middle duplex outlet cover for 2-gang boxes (for outlets with center screw)


4" x 4" JUNCTION BOX:


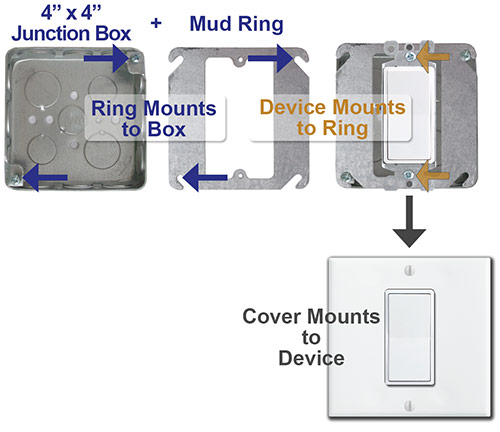
In 4x4 junction boxes with screws in opposite corners, you need a mud ring to center your switch or outlet.


The mud ring (also called a plaster ring) slips underneath the diagonal screws to secure to the box. The device then mounts to the ring and the cover plate goes over as it normally would in a single-gang box.

Shop the links below to get these covers, which are all compatible with this center-mount mud ring for 4x4 boxes:


  1. 2-gang plate for centered rocker devices
  2. 2-gang switchplate for middle toggle
  3. 2-gang outlet cover for 1 center duplex

4-11/16" JUNCTION BOX:


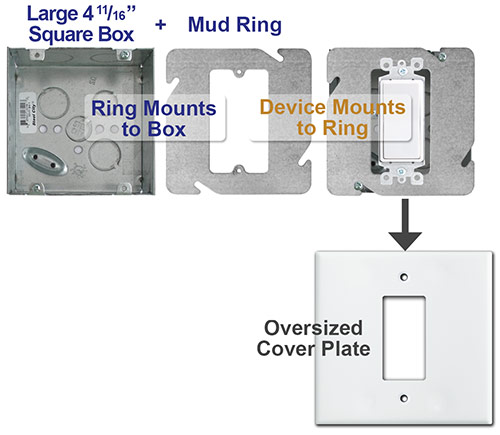
For larger junction boxes, you'll use this large plastic ring and oversized covers for centered devices (larger than the ones linked to for the 4x4 box above).

Although these boxes have 4 total screw tabs, you'll only be using 2 screws (in opposite corners) to attach the mud ring.


You can shop the links below to buy oversized covers. Each are compatible with this mud ring for large boxes:


  1. oversized centered rocker gfci outlet covers
  2. oversized center toggle switch wall plates
  3. oversized centered duplex outlet faceplates


Now you know how to cover these different types of 2-gang boxes and where to buy the parts.

Shop Kyle Switch Plates for all your electrical device and cover plate needs.

Tuesday, November 21, 2017

Fix Gap Behind Switch Plates & Outlet Covers

Have a gap between your switch plate and the wall?

If you've removed wall paneling, have an electrical box that sticks out from your wall, or if you've replaced an old outlet with a bulky new receptacle, you may have a gap that exists between the cover and wall.

There are 2 ways to fill a gap behind a cover plate.


  1. Get a cover with a deeper edge.
  2. Add a filler between the plate and the wall.

Options are detailed below for fixing gaps in 4 sizes:

  • 1/16"
  • 1/8" (there are 3 solutions for a 1/8" gap)
  • 1/4"
  • 1/2"

FIX A 1/16" GAP:


Certain Deep Plates - Toggle, Duplex, Horizontal Toggles, Combination


Recommended for 1/16" Gap

If you have a very slight gap of 1/16" behind a cover for toggles, duplex outlets or a combination of toggle and duplex/horizontal toggles, use deep plates with a 5/16" edge bevel.


FIX A 1/8" GAP:


Add a 1/8" Depth Ring Behind Cover Plate


Recommended for 1/8" Gap

If you have a gap that's 1/8" and you'd like to keep your current switch plate, you can get a gap filler to sit between your cover and the wall.

These depth rings fill a 1/8" gap nicely, and are simple to install. Sizes from 1-5 gangs, standard, oversized & specialty sizes.

Get them at Kyle Switch Plates - search "EXDR".


Place an Extender Ring Behind Wall Plate

Recommended for 1/8" Gap & Wall Damage

If there's any wall damage around the electrical box that isn't covered by your current switchplate, you can fix a 1/8" gap and expand the wall coverage with a depth extender ring.

Note these only come in white and will be visible behind a standard cover.

Get them at Kyle Switch Plates - search "OVC".


Get a Deep Cover Plate

Recommended for 1/8" Gap

If you aren't particularly attached to your old cover, you can simply toss it and
replace it with a deep plate.

Deep plates have a larger bevel on the edges, so they reach back around your electrical box to meet the wall.

Standard covers have a 5/32" bevel, while deep plates have twice as much bevel: 5/16".

Deep rocker plates will fix a 1/8" gap.

There are many sizes - shop deep plates here.


FIX A 1/4" GAP:

Electrical Box Extenders for 1/4" Gap

Recommended for 1/4" Gap

Plastic electrical box extenders sit underneath your switch plate and fill a gap of 1/4".

They are single-gang only (for 1 device) and come in white, ivory or brown.

If your issue isn't a protruding wall box, but instead a bulky device, these extenders will lift your device 3/4" forward & out of the electrical box.

Get them at Kyle Switch Plates - search "6197".


Deep Blank Plates for Empty Electrical Boxes

Recommended for 1/4" Gap

Cover .25" of an exposed electrical box that has no devices with a deep blank wall plate. Also available for empty double-gang boxes.


FIX A 1/2" GAP:


Buy an Extra Deep Cover


Recommended for 1/2" Gap

For electrical devices that really stick out from the wall, an extra deep wall plate will do the job.

These deepest covers fix a gap up to 1/2".

Finishes are limited (white & stainless steel only), but if you have to fill a gap that's nearly half an inch, this is your best bet.

Single-gang only. Get them at Kyle Switch Plates - search "DP" or "extra deep".


FIX ODD SIZED GAPS:

Spacers can be used to adjust your electrical devices.

Combine spacers with the solutions above if you're still having issues getting the right fit.

These little green rubbery things go underneath your switch or outlet (between the device and the electrical box) to lift devices up (in increments of 1/8").

If a deeper cover plate is too deep for your situation (resulting in sunken electrical devices that don't reach the cover plate snugly) simply stack as many spacers under the devices as necessary to pull them up where you need them.


Tuesday, September 26, 2017

Multi-Light Switch Plate & Outlet Cover Solutions

What to do when you can't find the configuration you need.


As a homeowner, you've no doubt removed a switch plate or outlet cover at some point - whether you were painting your walls or adding paneling, wainscot or tile.

And it's so simple, you've probably given it very little thought (except maybe keeping track of the screws while the plate was off the wall).

If you've lost a cover (you'd be surprised how many get thrown out when a professional painter is hired) or broken one (perhaps screwing the screws in too tight), you've likely run over to your local hardware store to find a replacement.

If that errand failed, you probably a rare configuration - meaning 2, 3 or 4 electrical devices that share a plate are lined up in an order that you can't find a cover for. (At least, you think you can't find a cover.)

The good news is...

There are several ways to solve this problem, which we'll detail below.

How to Get a Switch Plate with Device Cutouts in the Right Order


Solution 1: Re-arrange Your Devices


Often times, we get calls from customers who "almost" find what they need. For instance, a plate with the correct 3 cutouts, but they're not in the right order to match their switches or outlets.

Guest what - this is super, super common.

What many people don't realize is how easy it is to change the order of the devices in your electrical box.

If you have a duplex outlet in between a rotary dimmer and a rocker light switch, as shown here:


You may be looking for this triple cover plate configuration:


And we do carry this plate in 5 finishes (shown in ivory above). But if you're looking to match a room with specialty finish covers - for instance, dark bronze or satin brass - you're out of luck.

Unless, you simply re-arrange your devices. Turn off the power supply to these devices, and then unscrew them from the electrical box and change the order, then screw back into the box.


Now, you can get a cover plate in 11 finishes. And it will take you roughly 5 minutes to swap the position of your switches/outlets.

Solution 2: Update Your Devices


When you need a plate with a mix of cutouts, it narrows your options (rare combo plates often only come in white).

Updating one or two of your devices can solve your problem. Using the same example as above, let's say you have a rotary dimmer, duplex outlet and rocker switch.


Replacing the duplex outlet with a block outlet that fits a "Decora rocker" opening (same as for the rocker light switch), will result in the need for this combo cover plate, available in 17 finishes:


Block outlets are manufactured in more finishes than older duplex style outlets, so you'll have greater flexibility if you update your wall outlets to this modern style.

It takes a little more time, since you have to unwire the old outlet and re-wire in the new one (see instructions for swapping out an outlet here), but, in the end, you'll get the look you want.

Just do a little research (there are lots of installation videos on YouTube) and you can swap out a device without hiring an electrician.

While you're at it, you can also update to a rocker style dimmer to make finding your plate even easier - a triple rocker switch plate will be available at any hardware store that sells wall plates.


Solution 3: Create Your Plate with Inserts


For very specialized configurations - such as when a multi-device cover plate needs openings for phone and data jacks or needs a slot that's blank (closed off completely if there is no device in the slot), you can craft a custom plate with inserts.

An outlet & cable jack plate (shown in stainless steel below) is difficult to find and manufactured in very few finishes.


To get a greater variety of finish options, simply swap out the cable jack for a cable jack insert that fits into a rocker opening.


Not only does the duplex/rocker plate look more balanced with the cable jack insert, but you have much more options for matching the surrounding decor.

When you have a spot in your multi-gang electrical box that is no longer in use, you can get a plate that has a blank slot that covers the empty area behind it.


There are many configurations that incorporate blank positions (no cutout for a device - see center of plate above), but many times these are available in limited finishes (for example, the toggle-blank-rocker plate above).

Getting a configuration that has 3 openings and simply filling the unused one with a dummy switch or blank filler can broaden your options in terms of available finishes. You'll hardly notice the blank toggle filling the center position in the black cover plate:


For a box with a toggle, duplex outlet and toggle switch - a rare configuration - you'll only find a white plate to cover your devices (unless you re-arrange or update them, as explained in solutions 1 & 2 above).


Or, you can get a plate with a rocker opening in place of one of the toggle cutouts (for the above example, this plate), and convert that slot with a toggle insert for rocker openings.


Now, you can choose from more finishes, so you can get a cover plate that matches the others in the same room.

See other inserts and fillers to see all the possibilities for converting switch plate cover openings.

There you go - 3 simple solutions to finding the cover plate you need, in the finish you want, even when you think it doesn't exist.

Wednesday, August 23, 2017

Easy Fix When Your Switches Don't Line Up with the Cover Plate

After painting all the interior walls in my home, I decided to get update my light switches and cover plates from plain white to elegant ivory and oil rubbed bronze.

My husband is the son of an electrician, so I knew swapping out the light switches would be a breeze. (For him, anyway).

What I didn't expect was, that after all the new switches were screwed firmly into their electrical boxes, they didn't line up with the cutouts in my gorgeous new cover plates.

What?!

Did we get defective switch plates???


No, turns out...

When your switches don't line up with the cover plate, there's an easy fix:


First, I have to let you in on a little secret: The devices themselves are meant to have some "play" in them, so you can adjust them left to right and up/down to match up perfectly with the cover.

See how the screw hole (highlighted in orange in the image below) is an oval shape? It's bigger than the screw that mounts the switch to the electrical box.


All you have to do is loosen the screw a little bit and push the switch (or outlet) in the direction you need it to go in order for the cover plate to line up.

See?


Once it's in the proper position, just screw it back in tight and you're good to go!

After we made some minor adjustments to this switch shown here (and some others throughout the living room), everything lined up perfectly.


You may need to adjust all of the devices in your electrical box to get a multi-gang plate to line up with each switch.

So simple!

Side note: My husband didn't think we needed to go to all this effort to replace the electrical devices and covers, but now that they're in, he loves them!

IMPORTANT SAFETY NOTE: Always shut off the power to the device(s) before making adjustments to positioning.

Shop Kyle Switch Plates for new electrical devices and quality cover plates. An online superstore for high-end and hard-to-find electrical components - find solutions you won't get at your local hardware store.

Thursday, August 3, 2017

Covering a Single Switch in a Wide Box [2 Simple Solutions]

Sometimes a 2-gang electrical box (a box that's made to hold 2 switches or outlets) ends up with a single device.

Ripping out the double masonry box to replace it with a single handy box will result in a bigger hole in the wall and the need to replaster around it.

Save yourself the headache and cover your double wide box with 1 of 2 switch plates, which we'll show you below.

Problem:


Double wide electrical box with only a single device (could be a switch, outlet or data plug):


Solution 1:


If you don't mind things being a little off-balance, you can easily cover this switch with a double cover plate that has a switch cutout on the left and no cutout on the right:


The benefit of this simple solution is that a single rocker single blank cover is available in a variety of finishes, so you can easily match the plate to the color scheme of your walls, trim or decor.

Solution 2:


If having the switch off to one side bugs you, here's another solution.

You can get this centered switch cover which screws into your device to hold it in the middle. Simply remove the device from it's position in the electrical box, and attach it to the cover using the screws provided with the plate.

The plate then screws into the 4 tabs in the electrical box (the 2 not being used on the right and the 2 that previously held the switch to the left).


This plate is only available in white, so we recommend this solution if you have white molding and trim and want to keep the look fresh, like in a kitchen or powder room.

Buy Covers for Single Switches in Double Boxes:

Use the links below to order covers for toggle and rocker switches or duplex outlets that are mounted solo in a double size box.

These plates work with 2-gang masonry boxes that have 4 slots for screws, like these here:


(For covering other styles of boxes, see our Centered Device Tutorial here).

For Rocker Switches / GFCI Outlets:

1-cutout-1-blank covers for rockers
centered cutout covers for rockers

For Toggle Switches:

1-toggle-opening-1-blank cover
centered toggle covers for wider boxes

For Duplex Outlets:

1-outlet-1-blank cover plate
centered duplex outlet covers


Wednesday, April 19, 2017

Choosing Switch Plates for Dimmers by Type

You may have updated one of your light switches to a dimmer switch.

Or, you may already have a dimmer switch, but you need to replace the cover plate.

Either way, finding the right switch plate for a dimmer can be tricky. Use this guide to get the right plate for your switches.

Guide to Dimmer Light Switch Covers:

First, determine which type of dimmer you have:

Here are 4 types of dimmers, and each is shown here.


Identify Which Plate Opening You Need:

Once you have identified your dimmer's shape, you'll see which type of switch plate opening fits your dimmer:

Both toggle and rotary dimmers fit toggle switch plates.


Find the Right Combination Switch Plate:


Often times, a dimmer (or series of dimmers) sits alongside other types of light switches.

If that's the case, you will need to find a combination switch plate (a plate with more than 1 type of switch opening).


Converting a Switch Plate for a Dimmer


Here is an example of a 4-rocker plate that has 1 light switch, 2 rocker dimmers and 1 rotary dimmer:


You can see that the rotary dimmer opening is incorrect. In this case, a new combination switch plate can be purchased (in this case, a 1-toggle 3-rocker plate).

To keep the current plate, another solution is to convert the rocker opening with an insert. The rotary dimmer stem will fit through the small round hole in the center of this insert for a rocker plate opening.


Inserts sit underneath a switchplate to convert the opening. This is often the cheapest solution to fixing a tricky switch plate situation.


Friday, January 6, 2017

Extend Your Switch Plate to Protect Your Wall or Cover Damage

The area around your switch plate may look a little worn - especially if you have wallpaper. Years of grappling in the dark for the switch can leave your wallpaper looking dirty and worn through.


Another issue that's very, very common is when a hole is cut in the drywall for a new electrical device, and the hole turns out too big. Whoops!


(I have this problem even in my own house - and no one is more aware of the need to avoid this issue than I!)

The good news is, there are 2 solutions, which I have detailed for you below, so keep reading!

How to Extend Your Outlet or Light Switch Plate to Cover More of Your Wall:


Option #1: Buy an Oversized Switch Plate

A standard cover plate (2.75" W x 4.5" H) is only slightly larger than your electrical box.

Bump up the size to cover more wall space. Larger plates still have the same size of opening for your switch or outlet, and the screw holes are spaced the same.

Larger plates can be found in these sizes:
3.5" W x 5.5" H
4.5" W x 6.375" H
5.5" W x 7.5" H

All three of the sizes listed here are very popular sellers for a single-gang plate (a plate covering only one device). You can also find oversized plates to cover up to 7 devices in a single electrical box.

Learn more about oversized plates & see all sizes & configurations at Kyle Switch Plates.

This is the simplest and best looking option to cover wall damage or a large cutout in the sheetrock:


Depending on the size of the plate and the shape of the opening (Decora rocker, toggle or duplex), oversized or "jumbo size" switchplates come in a variety of finishes, allowing you to cover more wall space without compromising aesthetics.

Option #2: Add a Switch Plate Expander

Another choice to cover wall damage surrounding a light switch is to simply add a flat expander plate underneath your current cover.

Expander plates are .03" thick, only available in white, and can be purchased in 4 sizes:
4" W x 6" H - for a 1-gang plate
6" W x 6" H - for a 1-gang plate
6" W x 6" H - for a 2-gang plate
6" W x 8" H - for a 3-gang plate


This flat plate could be painted, covered with wall paper or fabric, or left plain. If you have a specialized cover you don't want to replace, this is the only way to extend the coverage of your plate.

These are great for both residential and commercial use.

If you have a high-traffic area in your home, school, office, retail store, restaurant, museum, daycare center, gallery, studio, airport, hospital or hotel lobby, you can also prevent wall damage by installing a switch plate expander or oversized plate.